Cutting crown on flat is a more precise since it can be held straight on the miter saw easier.
Cutting cornice flat.
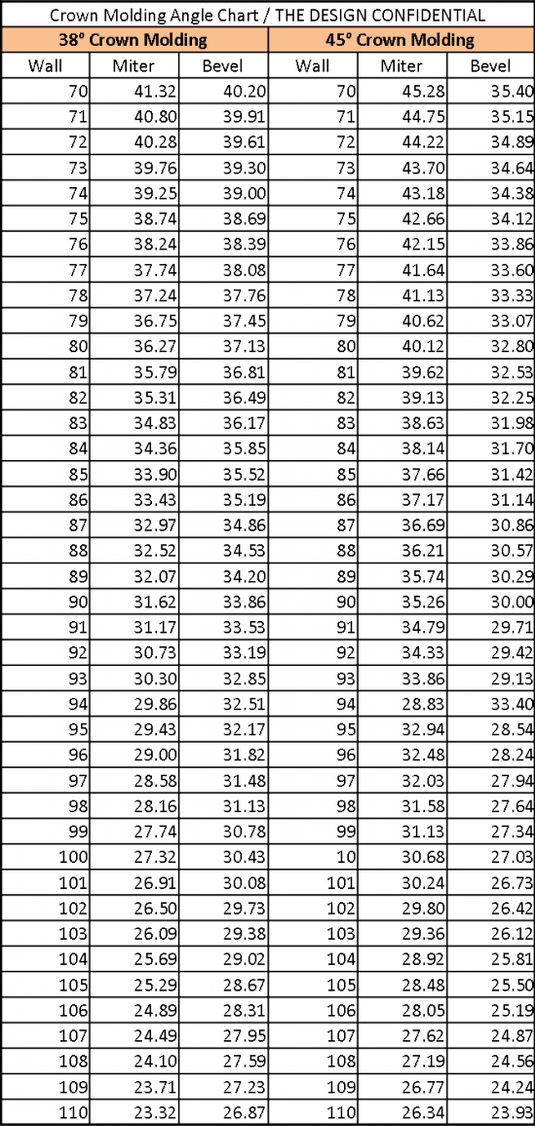
Set saw miter and bevel angles from table and diagrams below.
Top of molding doesn t have decorative edge.
Large crown may have to be cut on flat.
This may have a 10 inch or a 12 inch blade note.
Compound method flat molding laying with broad back surface down flat on saw table.
Flip the material around to cut both ends of the inside and outside corners.
Take your cornice board down and either clean the existing cover with a damp cloth or remove it by cutting it away with scissors.
One way to cut crown molding it to use the 90 degree intersection of the table and fence on a miter saw to play the part of wall and ceiling.
If you re using a 10 inch blade you will be able to cut cornice up to 4 inches tall while a 12 inch miter saw can cut it up to 6 inch tall molding.
5 lay your fabric on a clean flat surface with the printed side down.
You will use crown tables or the bosch digital protractor that will calculate the compound angles for you.
Set the template on the cornice apex on the edge that will adhere to the ceiling.
Sometimes the measure mark is against the fence and harder to see.
You must flip the material around to cut both ends of the inside and outside corners.
The left leg should touch the end of the length of cornice allowing for the width of the blade.
How to cut crown molding.
See the first photo.
Place molding in compound miter saw with broad back surface down flat on saw table visible decorative surface up.
A 12 inch compound sliding miter saw or radial arm saw is required for crown molding of more than 6 inches tall.
When doing this the fence plays the part of the wall and the table plays the part of the ceiling.
If you are a beginner start out with in position cutting.
So the crown molding sits upside down on the saw.
This video shows how to cut internal and extern.